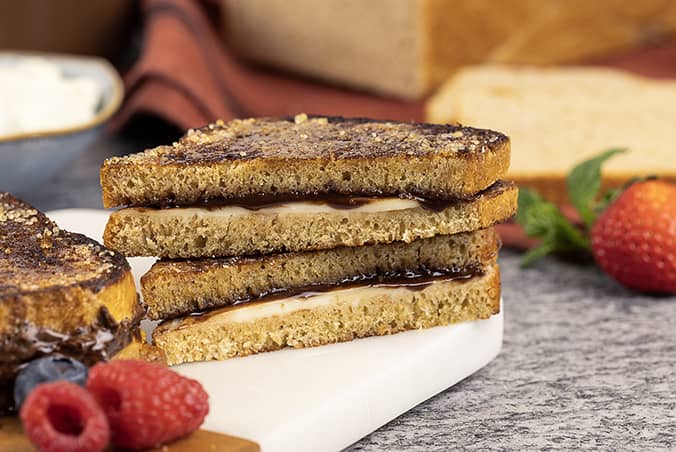
Nutella and Mascarpone Grilled Cheese Brûlée is a winner across multiple dayparts. This “dessert grilled cheese sammy” features chocolate hazelnut spread and mascarpone between tender sliced brioche, griddled and brûléed for a special crunchy treat, and served with a zippy Apricot-Strawberry Compote for dipping.
Directions – Nutella and Mascarpone Grilled Cheese Brûlée
1. Heat a nonstick skillet, cast-iron skillet, or plancha over medium heat.
2. Thinly slice (3/8″) two slices of Hard Red Brioche and spread mascarpone on one slice and Nutella on the other. Close sandwich and butter the exterior of each slice.
3. Place sandwich on cooking surface and brown, flipping frequently to make certain not to scorch the butter. Remove from the heat and allow to rest briefly, approximately 1 minute. Carefully cut grilled cheese diagonally with a very sharp knife, making certain not to lose any of the filling.
4. Sprinkle one side of each half of the sandwich with one-half of the turbinado. Ignite the torch (or make certain that the salamander is up to temperature) and brown lightly on one side only, adding turbinado as needed to replicate the surface of a caramelized crème brûlée dessert.
5. Spread a heaping spoonful of Apricot-Strawberry Compote on the plate, arrange the cut halves one standing and one flat, and dust with powdered sugar. Serve immediately
Directions – Hard Red Brioche
1. Combine warm milk, yeast, sugar, and eggs in the bowl of a stand mixer with the whip attachment fitted, making certain that there are minimal lumps of yeast. Allow to sit for 60-120 seconds.
2. Sprinkle in flours and switch the whip for a dough hook. Combine on second-slowest speed, adding the salt after 90 seconds.
3. When the dough has come together, continue to knead for 9 minutes on the same second-slowest speed. The dough should be relatively soft and mix well with the hook, neither forming too tight of a ball early in the mixing nor remaining crumbly or dry. Toward the end, your mixer will begin to struggle lightly, indicating that the gluten is being developed.
4. Gradually add the soft room-temperature butter, one cube at a time. Once all the butter is in, knead again for 10 minutes more until smooth, elastic, and soft. If you are concerned that the dough is not sufficiently elastic, stretch a 2-tablespoon ball between your fingers to make a “windowpane.” If it is translucent, the dough is finished beating. If not, continue with the dough hook until the dough is elastic, though no more than roughly 5-10 additional minutes.
5. Transfer the dough to an oiled bowl. Cover with plastic wrap and allow to rise in a warm (70-80°F) place until it doubles in volume. This can take under an hour or up to 2 hours.
6. Punch down the dough and reshape it into a ball. Cover again with plastic wrap and allow to rise in the refrigerator for a minimum of 6 hours and up to overnight. The longer you leave it to proof under refrigeration, the more flavor it will develop.
7. When it is time to shape, transfer the dough to a lightly floured surface and divide it into 2 even portions by weight. Shape each portion into a log that approximates the size and shape of the 13″ x 4″ x 4″ loaf pans, making certain that any seams are on the bottom of the formed loaves. Coat each loaf pan with neutral (avocado or canola) oil or cooking spray and place the loaves into the loaf pans.
8. Cover loaf pans with plastic wrap and allow to rise in a warm place. As with the initial proofing, this process can vary in the time required based on how warm the location is. Because the dough starts cold, do not be overly concerned if you do not observe rising for the first hour or so.
9. When the loaves have reached half of the distance to the top of your loaf pans, preheat the oven to 350°F. Make certain that the chamber is fully preheated before adding the loaves.
10. Beat one egg and very gently brush the top of each loaf, making certain not to deflate the dough.
11. Place the loaf pans on the center rack of your preheated oven and bake, checking and rotating each after 20 minutes depending on how consistent your oven is. After a total of 40 minutes, use an instant-read thermometer to check the internal temperature of the loaf; your goal is 180°F, which may take up to 55 minutes to achieve.
12. When the brioche has reached the desired internal temperature, turn out the loaves onto a wire cooling rack and allow to cool for no fewer than 90 minutes before slicing.
13. If you are freezing the brioche, wrap the fully cooled loaves tightly in plastic wrap and foil before storing in the freezer.
YIELD: 2 loaves
SHELF LIFE: 3 months frozen, 2 days refrigerated in a sealed container
Directions – Apricot-Strawberry Compote
1. Combine maple syrup, apricots, and strawberries in a medium saucepan and bring to a light simmer. Do not allow to boil.
2. Cool for 10 minutes and blend to create a mostly smooth compote.
3. Cool immediately and store covered under refrigeration.
CHEF NOTES: Do not strain, as the strawberry seeds add visual interest to the compote.
YIELD: 4 cups
SHELF LIFE: 2 weeks refrigerated

